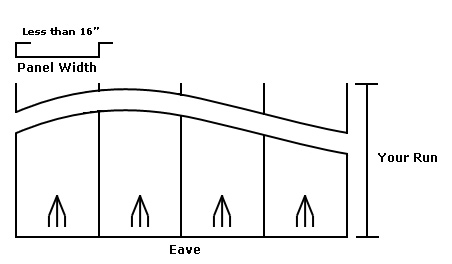
Profile: Panel valley width less than 16 inches
Pitch: 1/2/12 to 2/12 pitch
Use: 1 SnowBreaker per valley every 25 feet of roof.
Starting at 1 foot from the bottom edge, place a SnowBreaker in the center of each valley, in a straight line, across the entire roof area. Go up the roof 25 feet and repeat the straight line of guards in the center of every valley. Do not exceed 25 feet vertically between rows of guards. For Example: if your roof sheets are 30 feet long, your roof would require a row at 1 foot from the bottom and at 15 feet up from the bottom. When possible, always attempt to divide the roof areas into equal sections, with equal distance between rows, without exceeding the manufacturer maximum placement guidelines.
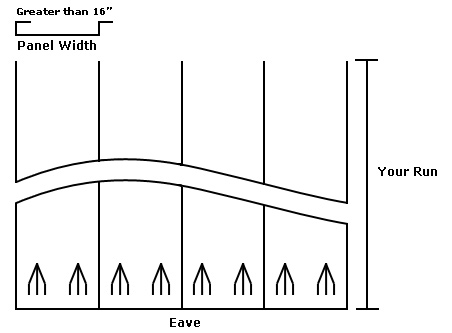
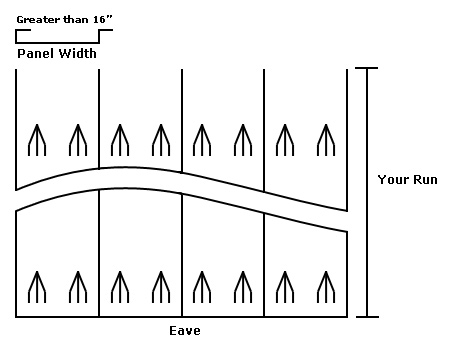
Profile: Panel valley width equal to or greater than 16 inches (not to exceed 24 inches)
Pitch: 1/2/12 to 2/12 pitch
Use: 2 SnowBreakers per valley every 25 feet of roof.
Starting at 1 foot from the bottom edge, place 2 SnowBreakers equally spaced apart in the valley, in a straight line, across the entire roof area. Go up the roof 25 feet and repeat the straight line of guards in every valley as placed below. Do not exceed 25 feet vertically between rows of guards. For Example: if your roof sheets are 30 feet long, your roof would require a row at 1 foot from the bottom and at 15 feet up from the bottom. When possible, always attempt to divide the roof areas into equal sections, with equal distance between rows, without exceeding the manufacturer maximum placement guidelines.
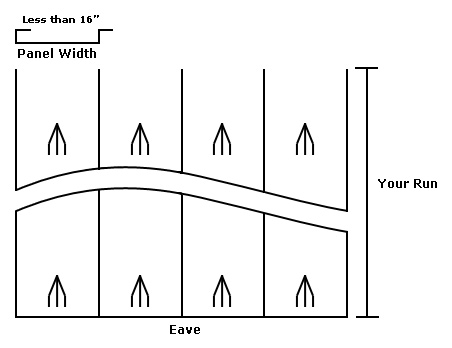
Profile: Panel valley width less than 16 inches
Pitch: Greater than 2/12 up to 4/12 pitch
Use: 1 snow guard per valley every 15 feet of roof.
Starting at 1 foot from the bottom edge, place a SnowBreaker in the center of each valley, in a straight line, across the entire roof area. Go up the roof 15 feet and repeat the straight line of guards in the center of every valley. Do not exceed 15 feet vertically between rows of guards. For Example: if your roof sheets are 20 feet long, your roof would require a row at 1 foot from the bottom and at 10 feet up from the bottom. When possible, always attempt to divide the roof areas into equal sections, with equal distance between rows, without exceeding the manufacturer maximum placement guidelines.
Profile: Panel valley width equal to or greater than 16 inches (not to exceed 24 inches)
Pitch: Greater than 2/12 up to 4/12 pitch
Use: 2 snow guards per valley every 15 feet of roof.
Starting at 1 foot from the bottom edge, place 2 SnowBreakers equally spaced apart in the valley, in a straight line, across the entire roof area. Go up the roof 15 feet and repeat the straight line of guards in every valley as placed below. Do not exceed 15 feet vertically between rows of guards. For Example: if your roof sheets are 20 feet long, your roof would require a row at 1 foot from the bottom and at 10 feet up from the bottom. When possible, always attempt to divide the roof areas into equal sections, with equal distance between rows, without exceeding the manufacturer maximum placement guidelines.
Profile: Panel valley width less than 16 inches
Pitch: Greater than 4/12 up to 6/12 pitch
Use: 1 snow guard per valley every 10 feet of roof.
Starting at 6 inches from the bottom edge, place a SnowBreaker in the center of each valley, in a straight line, across the entire roof area. Go up the roof 10 feet and repeat the straight line of guards in the center of every valley. Do not exceed 10 feet vertically between rows of guards. For Example: if your roof sheets are 12 feet long, your roof would require a row at 6 inches from the bottom and at 6 feet up from the bottom. When possible, always attempt to divide the roof areas into equal sections, with equal distance between rows, without exceeding the manufacturer maximum placement guidelines.
Profile: Panel valley width equal to or greater than 16 inches (not to exceed 24 inches)
Pitch: Greater than 4/12 up to 6/12 pitch
Use: 2 snow guards per valley for every 10 feet of roof.
Starting at 6 inches from the bottom edge, place 2 SnowBreakers equally spaced apart in the valley, in a straight line, across the entire roof area. Go up the roof 10 feet and repeat the straight line of guards in every valley as placed below. Do not exceed 10 feet vertically between rows of guards. For Example: if your roof sheets are 12 feet long, your roof would need a row at 6 inches from the bottom and at 6 feet up from the bottom. When possible, always attempt to divide the roof areas into equal sections, with equal distance between rows, without exceeding the manufacturer maximum placement guidelines.
Profile: Panel valley width less than 16 inches
Pitch: Greater than 6/12 up to 8/12 pitch
Use: 1 snow guard per valley every 7 feet of roof.
Starting at 6 inches from the bottom edge, place a SnowBreaker in the center of each valley, in a straight line, across the entire roof area. Go up the roof 7 feet and repeat the straight line of guards in the center of every valley. Do not exceed 7 feet vertically between rows of guards. For Example: if your roof sheets are 10 feet long, your roof would require a row at 6 inches from the bottom and at 5 feet up from the bottom. When possible, always attempt to divide the roof areas into equal sections, with equal distance between rows, without exceeding the manufacturer maximum placement guidelines.
Profile: Panel valley width equal to or greater than 16 inches (not to exceed 24 inches)
Pitch: Greater than 6/12 up to 8/12 pitch
Use: 2 snow guards per valley for every 7 feet of roof.
Starting at 6 inches from the bottom edge, place 2 SnowBreakers equally spaced apart in the valley, in a straight line, across the entire roof area. Go up the roof 7 feet and repeat the straight line of guards in every valley as placed below. Do not exceed 7 feet vertically between rows of guards. For Example: if your roof sheets are 10 feet long, your roof would require a row at 6 inches from the bottom and at 5 feet up from the bottom. When possible, always attempt to divide the roof areas into equal sections, with equal distance between rows, without exceeding the manufacturer maximum placement guidelines.
Profile: Panel valley width less than 16 inches
Pitch: Greater than 8/12 up to 12/12 pitch
Use: 1 snow guard per valley for every 5 feet of roof.
Starting at 6 inches from the bottom edge, place a SnowBreaker in the center of each valley, in a straight line, across the entire roof area. Go up the roof 5 feet and repeat the straight line of guards in the center of every valley. Do not exceed 5 feet vertically between rows of guards. For Example: if your roof sheets are 8 feet long, your roof would require a row at 6 inches from the bottom and at 4 feet up from the bottom. When possible, always attempt to divide the roof areas into equal sections, with equal distance between rows, without exceeding the manufacturer maximum placement guidelines.
Profile: Panel valley width equal to or greater than 16 inches (not to exceed 24 inches)
Pitch: Greater than 8/12 to 12/12 pitch
Use: 2 snow guards per valley for every 5 feet of roof.
Starting at 6 inches from the bottom edge, place 2 SnowBreakers equally spaced apart in the valley, in a straight line, across the entire roof area. Go up the roof 5 feet and repeat the straight line of guards in every valley as placed below. Do not exceed 5 feet vertically between rows of guards. For Example: if your roof sheets are 8 feet long, your roof would require a row at 6 inches from the bottom and at 4 feet up from the bottom. When possible, always attempt to divide the roof areas into equal sections, with equal distance between rows, without exceeding the manufacturer maximum placement guidelines.